
Laravel - React Fullstack Application with Passport, Redux and Material UI (Frontend)


In this section, we are going to be kicking off with the react (frontend part of our application). In the previous section, we developed our REST API and tested the endpoints using postman. Firstly, we will start by creating a new react application, then we will install and configure all the dependencies needed for our application such as redux, react-router, material UI etc.
This is the second part of the tutorial, in case you are seeing this first. You can check the first section here . Just as we did for the first part of this tutorial, we are going to continue building this application in steps. So, just follow the steps below.
1. Install React
As stated / shown in the first part of the tutorial, the folder structure of the application is as follows. We created a root folder with the name REACTPASSPORT (you can choose whatever name you want). Inside this root folder, we then have folders for our frontend and backend (which we worked on in the first part)
Now, we will install react in our Frontend folder.
cd into the root folder and run npx create-react-app frontend to create a fresh react project
2. Install React-Router and React-Router-Dom
React router allows us to navigate to different pages of our application without the pages refreshing as we navigate the app.
cd into the Frontend folder and run npm install --save react-router to install react router.
React-router works with react-router-dom because it exports DOM aware components such as and interacts with the browser.
To install react-router-dom, run npm install --save react-router-dom
3. Install Material-UI
We shall be using Material UI for our UI. It is a nice UI framework developed by google. It is easy to use and it provides us with smooth and mobile-friendly components we can integrate into our application.
To install material ui, run npm install @material-ui/core and npm install @material-ui/icons will install the icons we need.
4. Install Redux and React Redux, Redux-thunk
Redux is an open source javascript library for managing application state. While it's mostly used as a state management tool with React, you can use it with any other JavaScript framework or library such as Angular. It will help us to manage our state in our application.
To install redux, we run npm install redux. Furthermore, to make redux communicate with our application, we need to install react-redux. To install this, run npm install react-redux. This will install the latest version of react-redux.
At some point, we will have to debug our application for state changes. To do this, we will make use of redux-devtool. To set this up, install the devtool using.
npm install –save-dev redux-devtools. After it is installed, import and use it in our redux store. Also, install the redux-devtools extension in your browser (Chrome or Firefox)
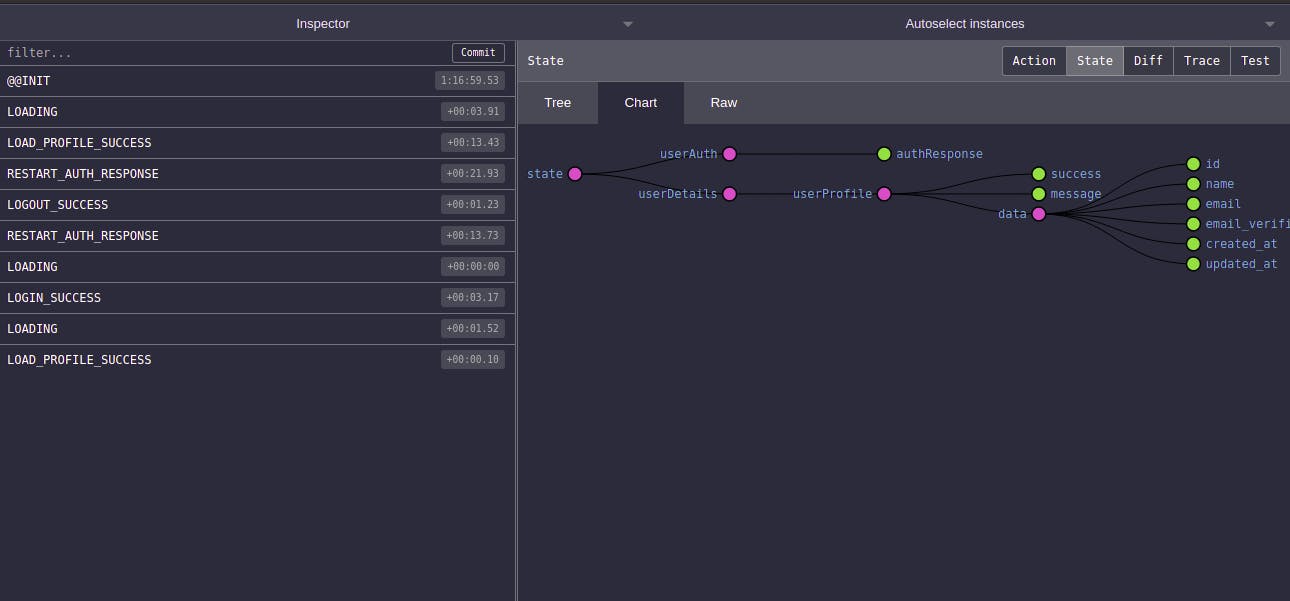
To debug our application using the devtool, open developer tool (or inspect) while app is running and choose the redux option. There you will see running actions and state. Including other details
Since our Frontend interacts with a REST API (developed in the Backend), we will be making asynchronous calls. Hence, we will be making use of redux-thunk. By definition, Redux Thunk is a middleware that lets you call action creators that return a function instead of an action object. That function receives the store's dispatch method, which is then used to dispatch regular synchronous actions inside the function's body once the asynchronous operations have been completed.
To install, run npm install --save redux-thunk.
5. Create Project Directory Structure
After all these installations, we will set up our frontend folder as shown below.
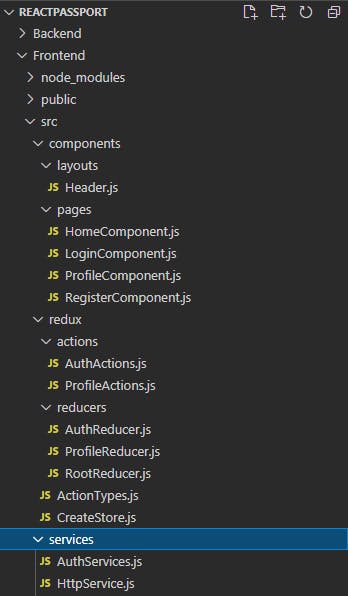
Inside the src folder, create a components folder that houses the header of our application (inside the layouts subfolder) and the different pages (inside the pages subfolder). The redux folder contains our store, action types, actions and reducers. We shall see the contents of these files very soon. Furthermore, our services folder contains our https service and services for both the authentication and the profile view parts of the application. This majorly contains our apps interaction with the server. The styles folder contains our custom styling for our material UI components. Finally, in the root of the src folders, you can see files such as Routes.js, PrivateRoute.js and Guard.js. These files are responsible for routing our application, setting private routes, and preventing unauthorized users from accessing specific pages respectively.
NB: This file structure is my personal preference, yours may not necessarily be like this.
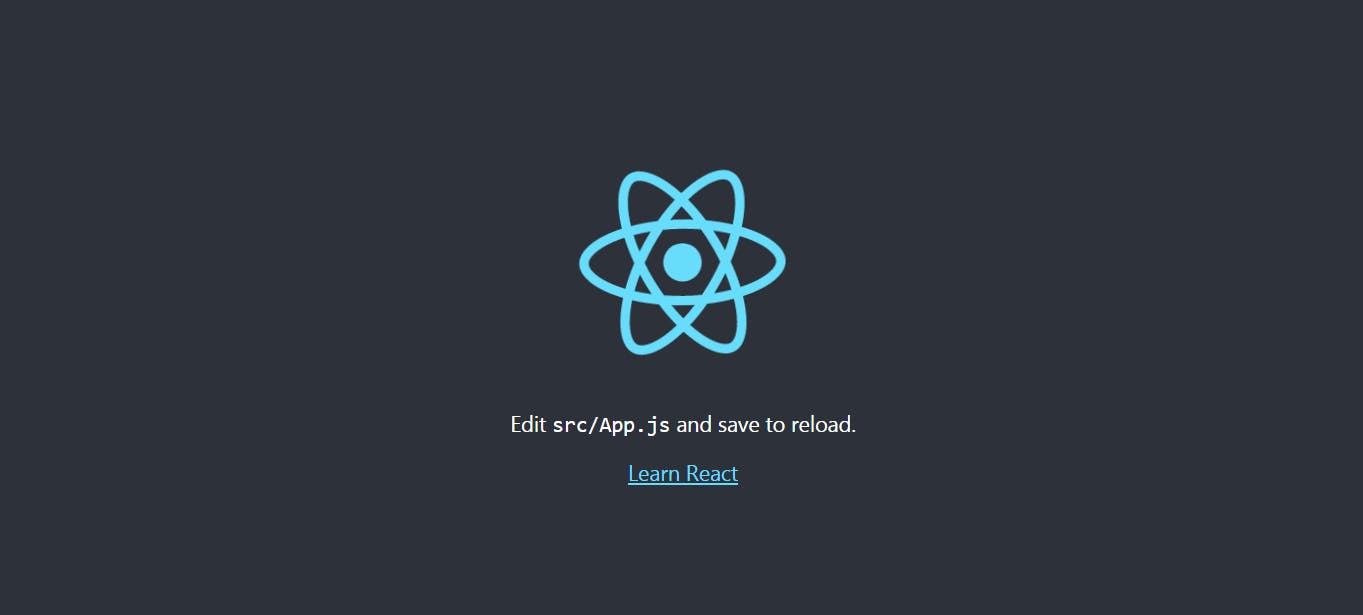
6. Start React
After we have set up everything, let’s start our react application.
Run npm start
Open your browser and visit http://localhost:3000. You will see the image below.
7. Create Services
a. Create Http Service
First and foremost, we have to create a connection between our react application and the REST API. I like to create a a service that sets our global URL and sets global functions for POST and GET requests.
HttpService.js
export default class HttpService
{
url = "http://localhost:8000/api";

postData = async(item, added_url, tokenId="") => {
const token = await localStorage.getItem(tokenId);

const requestOptions = this.postRequestOptions(token, item);

return fetch(this.url+"/"+added_url,requestOptions).then(
response=>response.json()
)
}

getData = async(added_url, tokenId="") => {
const token = await localStorage.getItem(tokenId);

const requestOptions = this.getRequestOptions(token);

return fetch(this.url+"/"+added_url,requestOptions).then(
response=>response.json()
)
}

getRequestOptions = (token) => {
let requestOptions = {
method: 'GET',
headers: {
'Authorization' : 'Bearer ' +token,
'Content-type' : 'application/json'
}
}
return requestOptions;
}

postRequestOptions = (token, item) => {
let requestOptions = {
method: 'POST',
headers: {
'Authorization' : 'Bearer ' +token,
'Content-type' : 'application/json'
},
body : JSON.stringify(item)
}
return requestOptions;
}
}
In this class, we have four functions and a global variable which is our url. Remember our Laravel API was set up on localhost:8000/api (/api because Laravel automatically append it to our APIs)
The first method postData takes three parameters: items, added_url and token_ID which is set to an empty string by default. Since we will be using our local storage to store our tokens, we will first check if the token exists in our local storage.
We then declare requestOptions which is the postRequestOptions which takes the item (body of data sent from the API) and token.
After this, we access the API using the Fetch API, which takes in the url, which is a concatenated string containing our base url (the global variable) and the added url and the requestOptions as the second argument.
The getData function is very similar to the postData. The only difference is that it takes in 2 parameters (added_url and tokenID)
getRequestOptions takes token as the argument. We create a requestOptions object variable which contains the http method used, the headers (authorization and content-type). We then return the object.
PostRequestOptions is similar to getRequstOptions. However, it takes in two parameters (token and item). The method is POST and it also has a body.
Since most of our request to the API will either be GET and POST, we have created functions for making these requests to the server.
We will now create services for authentication and profile. Basically, these services will import the global HttpService that was created above to get the parent URL / Domain name, send requests to the server and get a response. Our action dispatches the response while the reducers will manipulate the state, and the value of the changed state is seen in our view components.
b. Create Services for our Authentication and Profile
Create AuthService.js inside src/services
AuthService.js
import HttpService from './HttpService';
export const RegisterUserService = (credentials) => {
const http = new HttpService();
let signupUrl = "users/register";
return http.postData(credentials, signupUrl).then((data) => {
console.log(data);
return data;
}).catch((error) => {
return error;;
})
}

export const LoginUserService = (credentials) => {

const http = new HttpService();
let loginUrl = "users/login";
return http.postData(credentials, loginUrl).then((data) => {

console.log(data);
return data;
}).catch((error) => {
return error;;
})
}

export const LogOutUserService = () => {
const http = new HttpService();
let loginUrl = "users/logout";
const tokenId = "user-token";
return http.getData(loginUrl, tokenId).then((data) => {
console.log(data);
return data;
}).catch((error) => {
return error;;
})
}
We import our HttpService.js that we created. We then create a function to register the users which takes in credentials as its parameter. Inside the function, we create an instance of the HttpService and then use the postData function to establish a connection with the server.
Finally, we return the response from the server.
ProfileService.js
import HttpService from './HttpService';

export const LoadProfile = () => {
const http = new HttpService();
let profileUrl = "users/view-profile";
const tokenId = "user-token";

return http.getData(profileUrl, tokenId).then(data => {
console.log(data);
return data;
}).catch((error) => {
console.log(error);
return error;
});
}
8. Redux side of the App
After our services have been created, the next thing is to create actions and dispatch the actions created. First, we have to create our redux store first.
a. Create redux store (src/redux)
CreateStore.js
import {createStore, applyMiddleware, compose} from 'redux';
import thunk from 'redux-thunk';
import RootReducer from "./reducers/RootReducer"

export const store = createStore(
RootReducer,
compose(
applyMiddleware(thunk),
window.__REDUX_DEVTOOLS_EXTENSION__ &&
window.__REDUX_DEVTOOLS_EXTENSION__(),
),
);
The redux devtools extension is now being made us of as described in step four above. A pictorial illustration will be shown later.
b. Create ActionTypes.js (src/redux)
ActionTypes.js
export const RESTART_AUTH_RESPONSE = 'RESTART_AUTH_RESPONSE';
export const LOADING = 'LOADING';
export const SIGNUP_SUCCESS = 'SIGNUP_SUCCESS';
export const SIGNUP_ERROR = 'SIGNUP_ERROR';
export const CODE_ERROR = 'CODE_ERROR';
export const LOGIN_SUCCESS = 'LOGIN_SUCCESS';
export const LOGIN_ERROR = 'LOGIN_ERROR';
export const LOGOUT_SUCCESS = 'LOGOUT_SUCCESS';
export const LOGOUT_ERROR = 'LOGOUT_ERROR';
export const LOAD_PROFILE_SUCCESS = 'LOAD_PROFILE_SUCCESS';
export const LOAD_PROFILE_ERROR = 'LOAD_PROFILE_ERROR';
Above are the actions that will be carried out (dispatched) in this application. The actions are very self-explanatory.
c. Create Actions
Next, we will create two files AuthActions.js and ProfileActions.js, in these files we are going to dispatch our various actions (we will export them from the ActionTypes files) for the application.
Create AuthAction.js (src/redux/actions)
AuthActions.js
import * as ActionTypes from '../ActionTypes';
import {RegisterUserService, LoginUserService, LogOutUserService} from '../../services/AuthServices';

export const RegisterAction = (credentials) => {
return (dispatch) => {
dispatch({type: ActionTypes.RESTART_AUTH_RESPONSE});
dispatch({type: ActionTypes.LOADING});


RegisterUserService(credentials).then((res) => {
if(res.hasOwnProperty('success') && res.success === true){
dispatch({type: ActionTypes.SIGNUP_SUCCESS, res});
}else if(res.hasOwnProperty('success') && res.success === false){
dispatch({type: ActionTypes.SIGNUP_ERROR,res});
}
}, error => {
dispatch({type : ActionTypes.CODE_ERROR, error})
})
}
}

export const LoginAction = (credentials, history) => {
return (dispatch) => {
dispatch({type: ActionTypes.RESTART_AUTH_RESPONSE});
dispatch({type: ActionTypes.LOADING});


LoginUserService(credentials).then((res) => {
if(res.hasOwnProperty('success') && res.success === true){
localStorage.setItem('user-token',res.token)
dispatch({type: ActionTypes.LOGIN_SUCCESS});
history.push('/user');
}else if(res.hasOwnProperty('success') && res.success === false){
dispatch({type: ActionTypes.LOGIN_ERROR,res});
}
}, error => {
dispatch({type : ActionTypes.CODE_ERROR, error})
})

}
}

export const LogoutAction = () => {
return (dispatch) => {
dispatch({type: ActionTypes.RESTART_AUTH_RESPONSE});
LogOutUserService().then((res) => {
if(res.hasOwnProperty('success') && res.success === true){
dispatch({type: ActionTypes.LOGOUT_SUCCESS,res});
}else if(res.hasOwnProperty('success') && res.success === false){
dispatch({type: ActionTypes.LOGOUT_SUCCESS,res});
}
}, error => {
dispatch({type : ActionTypes.CODE_ERROR, error})
})
}
}
Here, we create three basic functions.
i. RegisterAction
ii. LoginAction
iii. LogoutAction
In the AuthAction file, we import the services we created in step seven (7). In the RegisterAction, we return our dispatch (Which is a function). Inside it, we then dispatch our various relevant actions.
The RESTART_AUTH_RESPONSE action is used to clear the values of the states before the request is made.
Then, the LOADING action will display something while we await a response from the API.
The RegisterUserService takes credentials and then returns a promise. We however check if the response has a property of success which implies that the request was successful. If it is successful, we then dispatch SIGN_UP_SUCCESS with the response.
If our res.success is false, we dispatch SIGNUP_ERROR and the response.
Lastly, if we encounter any random error, we dispatch CODE_ERROR and pass our error.
In the LoginAction, we dispatch RESTART_AUTH_RESPONSE and LOADING actions as we did in the RegisterAction. Furthermore, if the login is successful, we store the token in the local storage, dispatch LOGIN_SUCCESS action and use the history variable that we passed to the action from the react-router-dom via the LoginComponent.js. For the LogoutAction, we dispatch just the RESTART_AUTH_RESPONSE and if the request is successful, we simply dispatch the LOGOUT_SUCCESS action.
Create ProfileActions.js (src/redux/actions)
ProfileActions.js
import {LoadProfile} from '../../services/ProfileServices';
import * as ActionTypes from '../ActionTypes';

export const LoadProfileAction = () => {
return (dispatch) => {

console.log('yes');
dispatch({type: ActionTypes.LOADING});

LoadProfile().then((res) => {
if(res.hasOwnProperty('success') && res.success === true){
dispatch({type: ActionTypes.LOAD_PROFILE_SUCCESS,res});
}else if(res.hasOwnProperty('success') && res.success === false){
dispatch({type: ActionTypes.LOAD_PROFILE_ERROR,res});
}
}, error => {
dispatch({type : ActionTypes.CODE_ERROR, error})
})
}
}
In the ProfileAction above, we import our action and our LoadProfile service. If the request is successful, we dispatch the LOAD_PROFILE_SUCCESS action and if not successful we dispatch the LOAD_PROFILE_ERROR action.
d. Create Reducers
In our reducer files, we manipulate the state based on the actions dispatched. We first set the value of the response to an empty string. We will use switch to switch to different action types.
Create AuthReducer.js (src/redux/reducers)
AuthReducer.js
import * as ActionTypes from '../ActionTypes';
const initState = {
authResponse: "",
};
const AuthReducer = (state = initState, action) => {
switch (action.type) {
case ActionTypes.RESTART_AUTH_RESPONSE:
return {
...state,
authResponse: "",
};
case ActionTypes.LOADING:
return {
...state,
authResponse: "loading...",
};
case ActionTypes.SIGNUP_SUCCESS:
return {
...state,
authResponse: action.res,
};
case ActionTypes.SIGNUP_ERROR:
return {
...state,
authResponse: action.res,
};
case ActionTypes.LOGIN_SUCCESS:
return {
...state,
authResponse: "redirecting to dashboard...",
};
case ActionTypes.LOGIN_ERROR:
return {
...state,
authResponse: action.res,
};
case ActionTypes.LOGOUT_SUCCESS:
return {
...state,
authResponse: action.res,
};
case ActionTypes.LOGOUT_ERROR:
return {
...state,
authResponse: action.res,
};
case ActionTypes.CODE_ERROR:
return {
...state,
authResponse:
"There seems to be a problem, please refresh your browser",
};
default:
return state;
}
};
export default AuthReducer;
For each of the cases, with exception of the default case, we destructure the state, then add the response to the destructured state based on the actions dispatched.
Create ProfileReducer.js (src/redux/reducer)
ProfileReducer.js
import * as ActionTypes from '../ActionTypes';
const initState = {
userProfile: "",
};
const ProfileReducer = (state = initState, action) => {
switch (action.type) {
case ActionTypes.LOADING:
return {
...state,
userProfile: "loading...",
};
case ActionTypes.LOAD_PROFILE_SUCCESS:
return {
...state,
userProfile: action.res,
};
case ActionTypes.LOAD_PROFILE_ERROR:
return {
...state,
userProfile: action.res,
};
case ActionTypes.CODE_ERROR:
return {
...state,
userProfile:
"There seems to be a problem, please refresh your browser",
};
default:
return state;
}
};
export default ProfileReducer;
Just as we did for the AuthReducer.js, we set the value of the userProfile to an empty string, we then manipulate the state by first destructuring the state and adding the response to the state depending on the actions dispatched.
Since we have more than one reducer in our application, redux lets us combine multiple reducers into one that can be passed into our store by using a helper function named combineReducers.
Create RootReducer.js (in src/redux/reducer)
RootReducer.js
import {combineReducers} from 'redux';
import AuthReducer from './AuthReducer';
import ProfileReducer from "./ProfileReducer";

const RootReducer = combineReducers({
userAuth: AuthReducer,
userDetails: ProfileReducer,
});

export default RootReducer;
We import combineReducers from redux and we also import the individual reducer files. We then invoke combineReducers and pass to it as argument an object that contains all the individual reducers (AuthReducer and ProfileReducer) in this case.
9. Create Guards and Routes (including Private Routes)
In this section, we are going to create routes. And also, we are going to be protecting the pages that can only be visited by authenticated users from unauthorized users.
a. Create Guards (in /src) Guards.js
import React from 'react';
import {Route, Redirect} from 'react-router-dom';
export const Guard = ({component:Component, token:Token, routeRedirect,...rest}) => (
<Route {...rest} render={props => (
localStorage.getItem(Token) ?
<Component {...props}/> :
<Redirect to={{pathname:routeRedirect, state:{from:props.location}}} />
)}/>
);
In this page, we import Route and Redirect from react-router-dom. Our Guard is going to take some parameters.
i. Component – Basically the component we want to pass to our guard
ii. Token – Which is our access token in this case
iii. Route – This is basically the route we want to redirect to
iv. ...rest (we destructure it from the rest) I.e, take all remaining properties defined on the props object and collect them inside an argument called rest.
Next, we call our which will take our destructured last parameter and it’s going to render a function which will pass our props as parameter. The function is going to check if our access token exists in our local storage. If the token exist, redirect the user to the route the user wants to access, if not redirect the user to a route that we are going to specify.
b. Create Private Route (/src)
We will now create routes that are private. Private in the sense that they can only be assessed by logged in users, which translate to the fact that only the correct access tokens stored in the local storage will give unfettered access to these routes.
PrivateRoute.js
import React from 'react';
import {Switch,Route,Redirect} from 'react-router-dom';

import Profile from './components/pages/ProfileComponent';

export default function PrivateRoute(props) {
return (
<div>
{/*<Header/>*/}
<Switch>
<Route exact path={`${props.match.path}/view-profile`} component={Profile}/>
<Route exact path={props.match.path} render={props=> (
<Redirect to={{ pathname: `${props.match.path}/view-profile` }} />
)} />
</Switch>
</div>
);
}
c. Create Routes.js (/src)
This Route.js will enable us to navigate between different pages of our application.
Routes.js
import React from 'react';
import {Switch,Route,Redirect} from 'react-router-dom';

import Home from "./components/pages/HomeComponent";
import Login from "./components/pages/LoginComponent";
import Register from "./components/pages/RegisterComponent";

import PrivateRoute from './PrivateRoute';
import {Guard} from './Guard';

import Header from './components/layouts/Header';


function Routes(){
return (
<>
<Header/>
<Switch>
<Route exact path="/" render={props => (
<Redirect to={{ pathname: '/home' }} />
)}/>
<Route path="/home" component={Home}/>
<Route path="/user/login" component={Login}/>
<Route path="/user/register" component={Register}/>


{/*Redirect if not authenticated */}

<Guard path="/user" token="user-token" routeRedirect="/user/login" component={PrivateRoute}/>
</Switch>
</>
);
}

export default Routes;
We first import Switch, Route and Redirect from react-router-dom. The switch lets us change from one page to another. Firstly, within the switch, any time we call the index route /, we redirect the user to another route /home
Next, we create components HomeComponent, RegisterComponent, LoginComponent for our /home, /user/register, /user/login routes respectively.
We will also import our Guards.js and PrivateRoute.js.
We will then call our Guards.js, we set the path as /user, token is the access token we will set for our user, and the path we want it to be redirected to as the third parameter. Lastly, the component is PrivateRoute. So, all the routes inside the PrivateRoute is protected.
10. Move to the views
We now move to the “view” section of our application. We will first start from the index.js page located inside the src folder.
a. Edit index.js page (/src)
index.js
import React from 'react';
import ReactDOM from 'react-dom';
import './index.css';
import App from './App';
import reportWebVitals from './reportWebVitals';
import {store} from './redux/CreateStore';
import {Provider} from 'react-redux';

ReactDOM.render(
<React.StrictMode>
<Provider store={store}>
<App />
</Provider>
</React.StrictMode>,
document.getElementById('root')
);

reportWebVitals();
First, we import our store from our redux folder and Provider from react-redux. We wrap the Provider around our application. The provider makes our redux store available to every component inside our application.
b. Edit App.js (src)
App.js
import './App.css';
import {BrowserRouter} from 'react-router-dom';
import Routes from "./Routes";

function App() {
return (
<BrowserRouter>
<div className="App">
<Routes/>
</div>
</BrowserRouter>
);
}

export default App;
In our App.js, as you can see, we import the Routes.js and also wrap the whole application inside the BrowserRouter imported from ‘react-router-dom’. This enables routing on our application using url segments. This makes our single page application feel more like a traditional webpage.
You can add the following lines to the App.css file to further beautify our application and link the file in the App.js as shown above.
.App {
  text-align: center;
}

.App-header {
  background-color: #282c34;
  min-height: 100vh;
  display: flex;
  flex-direction: column;
  align-items: center;
  justify-content: center;
  font-size: calc(10px + 2vmin);
  color: white;
}
c. Create Header.js (src/components/layouts)
Let me say at this point that we will be using functional based components in this application. This means that we will be making use of React Hooks functions such as useEffect and useState. Now, after creating the Header.js component, copy the following codes inside. The custom stylings for material UI is located in the styles folder as styles.js. This will make your application more aesthetically pleasing.
Header.js
import React,{useEffect} from 'react';
import {AppBar, CssBaseline, Toolbar, Typography, Button} from '@material-ui/core';
import {useStyles} from '../../styles/styles';
import {LogoutAction} from '../../redux/actions/AuthActions';

import {useDispatch, useSelector} from 'react-redux';
import {useHistory,Link} from 'react-router-dom';

export default function Header(props) {
const history = useHistory();
const classes = useStyles();

const dispatch = useDispatch();

const authResponse = useSelector(state=>state.userAuth.authResponse);

const logOut = () => {
dispatch(LogoutAction());
history.push("/user/login");
}

const login = () => {
history.push("/user/login");
}

const token = localStorage.getItem('user-token');


useEffect(() => {
if(authResponse !== "" && authResponse.success === true){
alert(authResponse.message);
localStorage.removeItem('user-token');

}
return () => {
};
},[authResponse])


return (
<div className={classes.root}>

<CssBaseline />
<AppBar position="fixed" className={classes.header}>

<Toolbar>

<Typography variant="h6" noWrap className={classes.title}>
<Link to="/home" className={classes.link}> FourTwoFour</Link>
</Typography>

<Typography variant="h6" noWrap className={classes.title}>
Welcome to User Dashboard
</Typography>
{
token !== null && token !== "" ?
<Button color="inherit" onClick={logOut}>Logout</Button> :
<Button color="inherit" onClick={login}>Login</Button>

}
</Toolbar>

</AppBar>

</div>
);
}
styles.js
import { makeStyles } from '@material-ui/core/styles';

export const useStyles = makeStyles(theme => ({
    homeRoot: {
      display: 'flex',
      '& > *': {
        margin: theme.spacing(1),
      },
    },

    containerDiv: {
      flex:'auto',
      position: 'fixed',
      top: '40%',
      left: '42.5%',
    },
    extraBtnStyle:{
      margin:'2%'
    },
    centerItem:{
      flex:'auto',
      top:'15%',
      position:'relative',
      left:'25%',
      right:'25%',
      width:'50%',
      marginBottom: '50px',
      marginTop: '60px'
    },
    fullWidth:{
      width:'90%',
     marginBottom:'25px',
     marginTop:'20px'
    },
    linkContainer:{
     marginBottom:'20px'
    },
    authResponse:{
      fontWeight:'bolder'
    },
    title: {
      flexGrow: 1,
    },
   fullWidthProfile:{
     width:'70%',
     marginRight:'15%',
     marginLeft:'15%',
     marginTop:'80px'
   },
   link: {
     color: 'white',
     textDecoration: "none"

   },

  }));
We import our material UI components and icons (please read on material UI for more understanding). We also import the useStyles from our materialUI custom styling. Then we import useHistory and Link form react-router dom. Furthermore, we import useDispatch and useSelector from react-redux. In class based components, we had to import connect from react-redux and wrap our components with it in order to map state to props or match dispatch to props. With React Hooks, the equivalent of mapStateToProps is useSelector, while the close equivalent of mapDispatchToProps is useDispatch.
We create classes which is an instance of useStyles. Variable history is also an instance of useHistory. It enables us to navigate to another page through its push object.
Because the Header has logout functionality, we are going to import our LogOut action from the AuthAction.js file. We then dispatch the action via the useDispatch method.
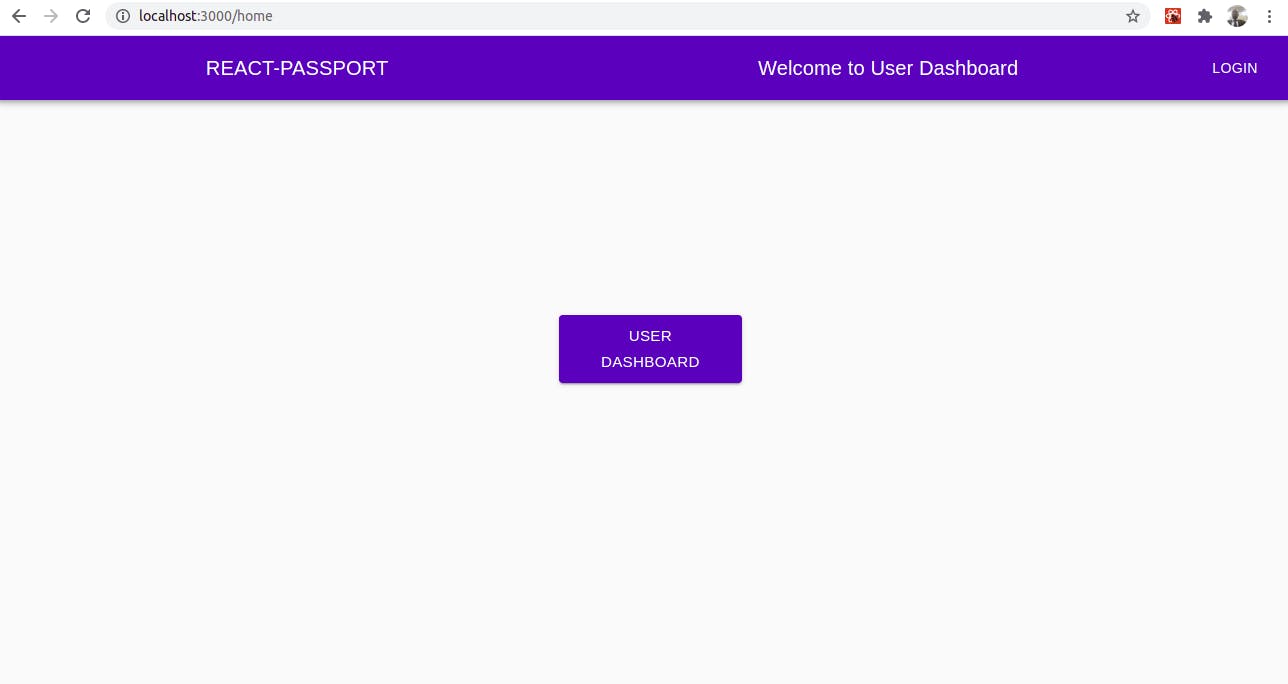
d. Create the Home Page (components/pages)
After creating the Header, next is the homepage. There isn’t much going on in the home component. Just a button to take the user to the dashboard (if authenticated) or redirect to login page on click.
HomeComponent.js
import React from 'react';
import {Button} from '@material-ui/core';
import { useStyles } from '../../styles/styles';
import {useHistory} from 'react-router-dom';

function HomeComponent() {

const history = useHistory();

const classes = useStyles();

const gotToDashboard = (e, url) => {
history.push(url);
}

return (
<>
<div className={classes.homeRoot}>
<div className={classes.containerDiv}>
<Button variant="contained" className={classes.extraBtnStyle} onClick={e => gotToDashboard(e, '/user')}
size="large" color="primary">User Dashboard
</Button>
</div>
</div>
</>
)
}

export default HomeComponent
e. Create Register Page (components/pages)
RegisterComponent.js
import React,{useState} from "react";
import { Button, TextField, Card } from "@material-ui/core";
import AccountCircleIcon from "@material-ui/icons/AccountCircle";
import { useStyles } from "../../styles/styles";

import {Link } from "react-router-dom";

import {useDispatch, useSelector} from 'react-redux';
import {RegisterAction} from '../../redux/actions/AuthActions';


function RegisterComponent() {
const classes = useStyles();

const dispatch = useDispatch();

//const authResponse = useSelector(state=>state.userAuth.authResponse);

const [fields, setState] = useState({
name: "",
email: "",
password: "",
password_confirmation: "",
});

const handleFieldChange = e => {
setState({
...fields,
[e.target.id] : e.target.value
})
}

const UserRegister = (e) => {
e.preventDefault();
console.log(fields);
const passwordMatch = checkPasswordMatch(fields.password, fields.password_confirmation);

if(passwordMatch === true){
alert('passwords dont match. please check your password again');
return;
}
dispatch(RegisterAction(fields));
};

const checkPasswordMatch = (password,password_confirmation) => {
return password !== password_confirmation ? true : false;
}
return (
<div>
<div className={classes.centerItem}>
<Card>
<h2>
<b>Welcome to Register User Page</b>
</h2>

<form onSubmit={UserRegister}>
<div>
<TextField
type="text"
className={classes.fullWidth}
required
margin="normal"
variant="outlined"
label="name"
id="name"
value={fields.name}
onChange={handleFieldChange}
/>
</div>

<div>
<TextField
type="email"
className={classes.fullWidth}
required
margin="normal"
variant="outlined"
label="email"
id="email"
value={fields.email}
onChange={handleFieldChange}
/>
</div>

<div>
<div>
<TextField
className={classes.fullWidth}
label="Password"
type="password"
margin="normal"
variant="outlined"
required
id="password"
value={fields.password}
onChange={handleFieldChange}
/>
</div>

<div>
<TextField
className={classes.fullWidth}
label="Confirm Password"
type="password"
required
margin="normal"
variant="outlined"
id="password_confirmation"
value={fields.password_confirmation}
onChange={handleFieldChange}
/>
</div>

<div>
<Button
type="submit"
className={classes.fullWidth}
variant="contained"
color="primary"
endIcon={<AccountCircleIcon />}
>
<b>Register</b>
</Button>
<br />

<div className={classes.linkContainer}>
<Link to="/user/login">Login Here</Link>
</div>
</div>

<div className={classes.linkContainer}>
<Link to="/home">Back To Home Page </Link>
</div>

<div></div>
</div>
</form>
</Card>
</div>
</div>
);
}

export default RegisterComponent;
From the register component above, we first import all the material UI components that we need. Next, we import react useState Hooks function to get the values of our inputs to the form. (material UI components such as TextField, Button etc). We do this by using the handleFieldChange function.
Also, we check if the password and password confirmation are the same using the checkPasswordMatch function. We then make use of this function inside the UserRegister function.
We import RegisterAction from our AuthAction.js. We then create an instance of the useDispatch function and also use useSelector to get our global state and also go straight to the property of the state we are looking for. (This is optional except you want to print out error messages, which we are not doing in this tutorial)
We then dispatch the RegisterAction which takes in our form fields as argument.
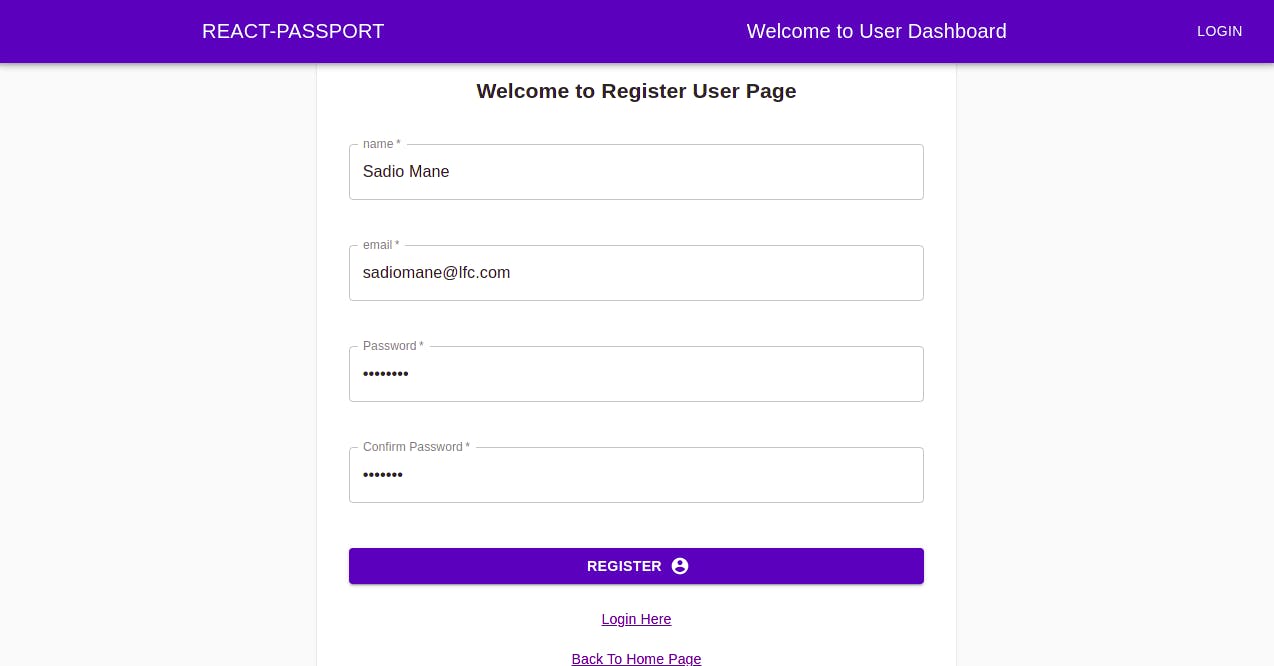
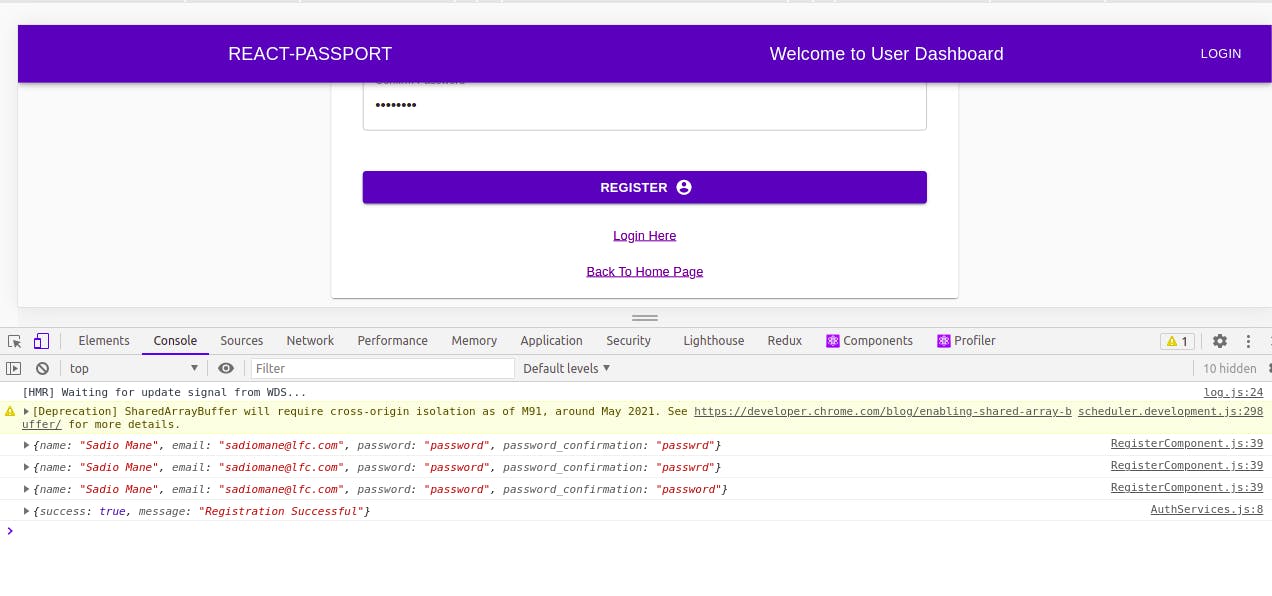
If we head into our browser and navigate to the register page, we will see that our register page is now set. If we try to register a user, we will see a success message in the console printed from our AuthService.js
f. Create Login Page
import React,{useState} from 'react';
import { Button, TextField, Card } from "@material-ui/core";
import AccountCircleIcon from '@material-ui/icons/AccountCircle';
import {useStyles} from '../../styles/styles';

import {useDispatch, useSelector} from 'react-redux';

import {LoginAction} from '../../redux/actions/AuthActions';


import {useHistory,Link} from 'react-router-dom';

function LoginComponent() {

const history = useHistory();
//console.log(history);
const classes = useStyles();
const dispatch = useDispatch();

//const authResponse = useSelector(state=>state.userAuth.authResponse);

const [fields, setState] = useState({
email: "",
password: "",
});

const handleFieldChange = e => {
setState({
...fields,
[e.target.id] : e.target.value
})
}

const UserLogin = (e) => {
e.preventDefault();
console.log(fields);
dispatch(LoginAction(fields, history));
};


return (
<div>
<div className={classes.centerItem}>
<Card>

<h2><b>Welcome to User Login Page</b></h2>

<form onSubmit={UserLogin}>
<div>
<TextField
type="email"
className={classes.fullWidth}
required
margin="normal"
variant="outlined"
label="email"
id="email"
value={fields.email}
onChange={handleFieldChange}
/>
</div>

<div>
<div>
<TextField
className={classes.fullWidth}
label="Password"
type="password"
margin="normal"
variant="outlined"
required
id="password"
value={fields.password}
onChange={handleFieldChange}
/>
</div>

<div>
<Button
type="submit"
className={classes.fullWidth}
variant="contained"
color="primary"
endIcon={<AccountCircleIcon />}
>
<b>Login</b>
</Button>
<br />

<div className={classes.linkContainer}>
<Link to="/user/register">Register Here</Link>
</div>
</div>

<div className={classes.linkContainer}>
<Link to="/home">Back To Home Page </Link>
</div>

<div></div>
</div>
</form>
</Card>
</div>
</div>
)
}

export default LoginComponent
The login page is almost the same with the register page. The only difference is that we have just two inputs. Email and password. Also, we are importing LoginService from the AuthAction.js. Also, you will notice that the LoginService takes in two arguments. First is the fields just as the case was with RegisterService. The second argument is the history (from react-router-dom) which will enable us to be redirected to the right page after successful login.
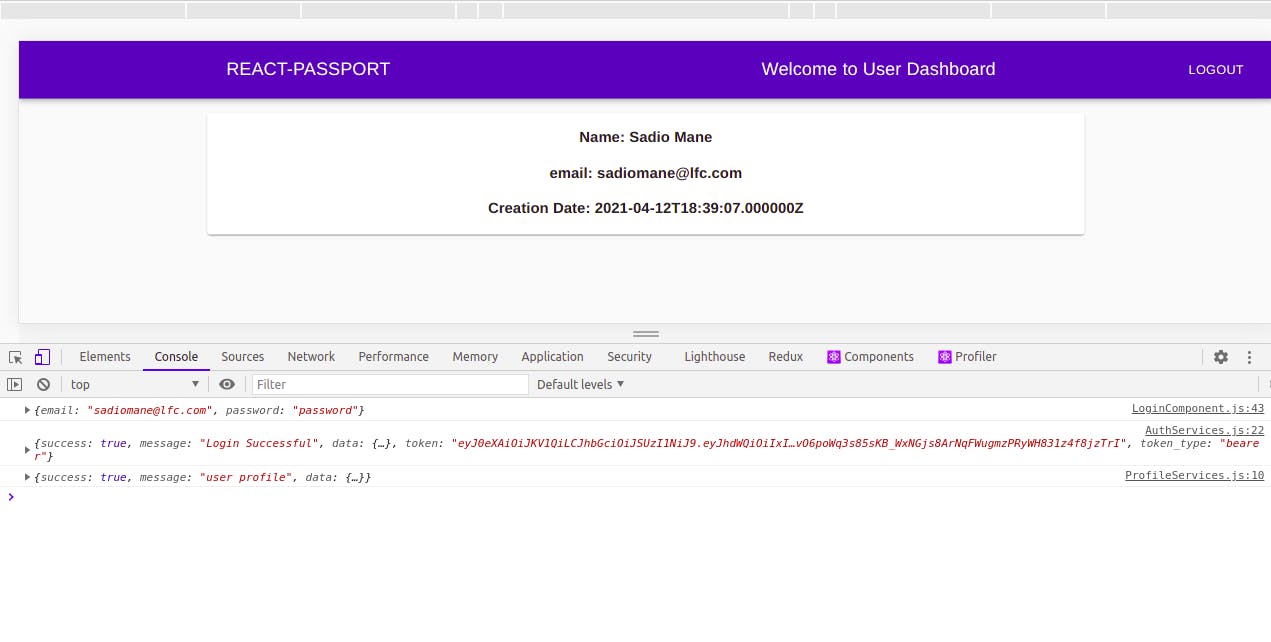
Let us now try and login the user we created in the register step above.
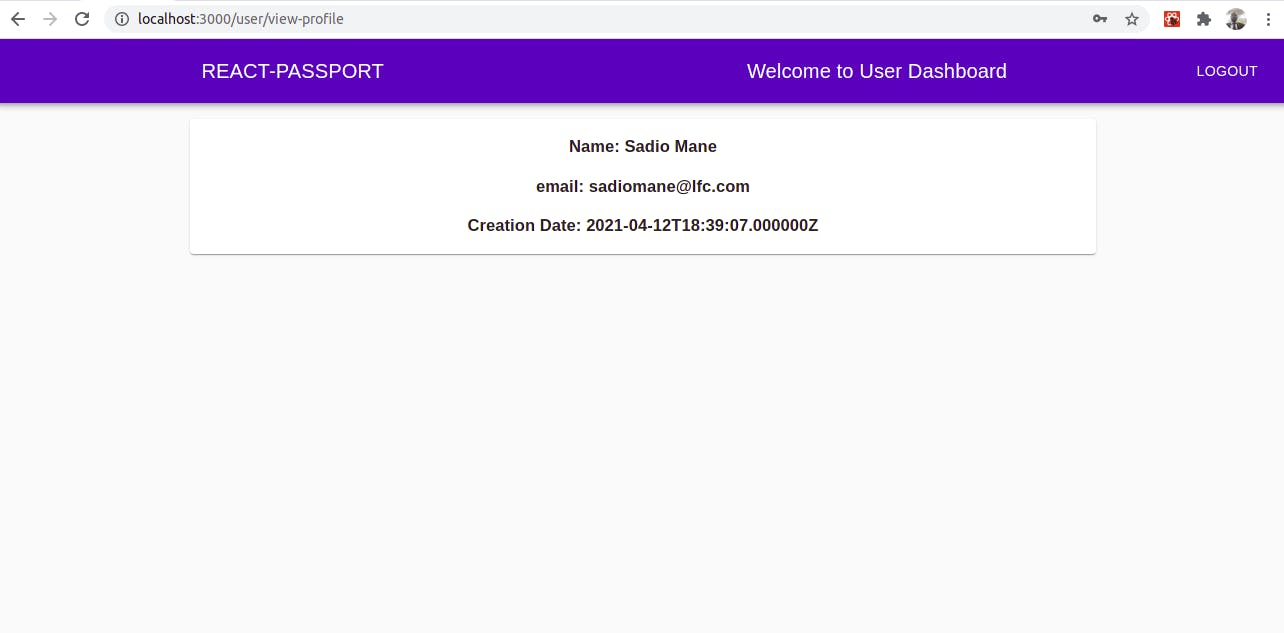
g. Create Profile Page
import React,{useEffect} from 'react';
import {Card} from '@material-ui/core';
import {useStyles} from '../../styles/styles';
import {useDispatch, useSelector} from 'react-redux';
import {LoadProfileAction} from '../../redux/actions/ProfileActions';

export default function ProfileView() {
const classes = useStyles();

const dispatch = useDispatch();

const profileResponse = useSelector(state=>state.userDetails.userProfile);

useEffect(() => {
dispatch(LoadProfileAction());
return () => {
};
}, [])

return (
<div className={classes.fullWidthProfile}>
<Card>
{
profileResponse !== "" && profileResponse !== null && profileResponse.success === true ?

<div>
<h3><b>Name: {profileResponse.data.name}</b></h3>
<h3><b>email: {profileResponse.data.email}</b></h3>
<h3><b>Creation Date: {profileResponse.data.created_at}</b></h3>
</div>
:
<div>Unable to display profile</div>

}
</Card>
</div>
);
}
For the profile page, we import the material UI components, we also import useDispatch and useSelector from ‘redux’. When this page loads, we want the profile of the user to be displayed. The profileResponse will give us the information / data of the user.
In a class based component, the componentDidMount lifecycle function performs this function, but since we are using functional based component, we will use the useEffect Hooks function for this. This does not mean that it is equivalent to componentDidMount. However, if you pass an empty array, the state will only be updated on the first render, exactly like componentDidmount.
Having Logged in, lest us move to our profile page.
Below is a view of the redux devtool on our profile page, showing the global state, all it's tributaries and all actions dispatched.
Finally, Our application is set, up and running. I hope the "short" tutorial was interesting and educative.
NB: You can find the full source code for the tutorial on here .