

Laravel - React Fullstack Application with Passport, Redux and Material UI (Backend)


Many applications are a mix of public and private pages. There are pages that are accessible to the general public while there are pages that are only opened to authorized users. These pages will require the user to login. Your React application will have to handle users logging in and directing them to the private pages if login is successful, or redirecting them if login is not successful.
In this tutorial, we shall be building a fullstack application (frontend and backend) using Laravel and React. We will focus more on the security architecture (authentication and authorization). For the backend authentication, we will be using Passport for authentication. There are other methods of authentication you can use to secure your API in Laravel. We have:
- JWT (I wrote a tutorial on this, you can check it out here )
- Laravel Sanctum
- Laravel Authentication - Built in Laravel Authentication
- Laravel Socialite
Our application will be divided into two. We have the backend where we will design our API and the frontend where we will design the User interface etc Hence, our application will be structured as follows.
- Backend – Containing our Laravel application for developing the API (we will work on this in this first part of the tutorial)
- Frontend – Containing our React – Redux Application
Both our frontend and backend segments will be located inside the same folder. Create a folder named “REACTPASSPORT” or whatever name you wish to give your application. I like this folder structure because it enables me to easily work on and transition between the frontend and the backend of my application.
Prerequisite
- Working knowledge of Laravel
- Working Knowledge of React and Redux
- Making Requests with Postman
We will start by first developing the API. We will follow the following points
1. Install Laravel
In this section, we will install a fresh Laravel application, create a new database and edit the .env file with our database details.
To create a new application cd into the passport-react folder and run the command below
composer create-project laravel/laravel backend
Create database and connect your Laravel application with the database via the .env file. In my case, I am using Mysql. You can also use PostgreSql.
2. Install Passport
To secure this application, we will install Laravel Passport and generate an access token for each user on logging in. This will allow the users to have access to the protected endpoints in our application.
To do this cd into the Backend folder and run:
composer require laravel/passport
3. Manipulate and migrate “users” table
Locate the timestamp_create_users_table.php file in database/migrations directory, and edit the up function as shown below to adapt it to our application's special needs. Having installed Passport, a new migration file containing the tables needed to store clients and access tokens will have been generated for the application.
public function up()
{
Schema::create('users', function (Blueprint $table) {
$table->id();
$table->string('name');
$table->string('email')->unique();
$table->timestamp('email_verified_at')->nullable();
$table->string('password');
$table->rememberToken();
$table->timestamps();
});
}
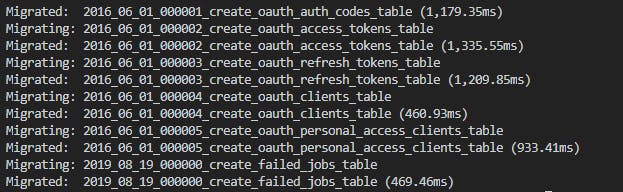
Run php artisan migrate to create (migrate) the tables.
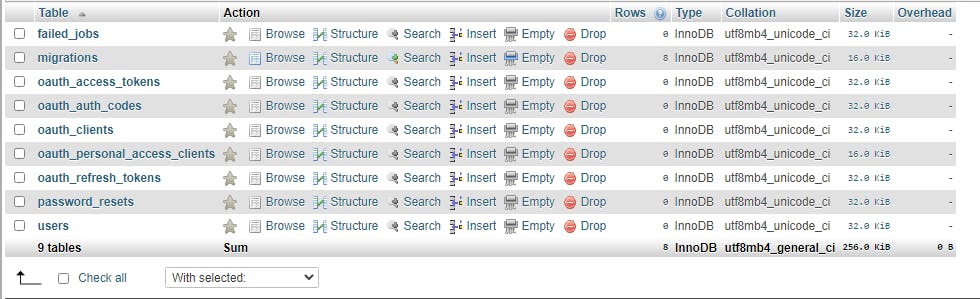 Our Database view
4. Set up Passport
Run php artisan passport:install
This will create the encryption keys needed to generate secured access tokens
5. Add Laravel Passport HasAPITokens Trait
Add the HasApiTokens trait to the App/User model as shown below. This trait supplies methods that the model can use to inspect the authenticated user’s token and scopes.
use Laravel\Passport\HasApiTokens;

class User extends Authenticatable
{
use HasApiTokens, HasFactory, Notifiable;

…
}
6. Register Routes for issuing access tokens
We need to register the routes necessary to issue and revoke access tokens. To do this, we call the Passport::routes method within the boot method of the AuthServiceProvider.php file located in app/Providers folder. Also, within this method, we can indicate how long we want the token to remain valid for.
namespace App\Providers;

use Illuminate\Foundation\Support\Providers\AuthServiceProvider as ServiceProvider;
use Illuminate\Support\Facades\Gate;
use Laravel\Passport\Passport;

class AuthServiceProvider extends ServiceProvider
{
...
public function boot()
{
$this->registerPolicies();

if (! $this->app->routesAreCached()) {
Passport::routes();

Passport::tokensExpireIn(now()->addDays(1));
}


}

}
7. Set driver option in config/auth
To authenticate incoming requests set the driver option of the api authentication guard to passport. This is located inside the config/auth.php.
return [


'defaults' => [
'guard' => 'web',
'passwords' => 'users',
],


'guards' => [
'web' => [
'driver' => 'session',
'provider' => 'users',
],
'api' => [
'driver' => 'passport',
'provider' => 'users',
'hash' => false
],
],


'providers' => [
'users' => [
'driver' => 'eloquent',
'model' => App\Models\User::class,
],


];
Now, your Laravel application is ready to handle all authentication and authorization within the application.
8. Create and register CORSMiddleware
This will help us to handle and set all required headers for the application. This includes allowing cross origin request coming from all domains. This will come very handy when working with our frontend client.
We will make a middleware for this, which will serve as a bridge between the request and the response. In this way, all our requests will pass through or be filtered by the middleware. To make the middleware, run php artisan make:middleware CORSMiddleware
namespace App\Http\Middleware;

use Closure;
use Illuminate\Http\Request;

class CORSMiddleware
{
public function handle(Request $request, Closure $next)
{
//Intercepts OPTIONS requests
if($request->isMethod('OPTIONS')){
$response = \response('', 200);
}else{
//Pass the request to the next middleware
$response = $next($request);
}
$response->header('Access-Control-Allow-Origin',"*");
$response->header('Access-Control-Allow-Methods','PUT, GET, POST, DELETE, OPTIONS, PATCH');
$response->header('Access-Control-Allow-Headers',$request->header('Access-Control-Request-Headers'));
$response->header('Access-Control-Allow-Credentials','true');
$response->header('Accept','application/json');
$response->header('Access-Control-Expose-Headers','location');
return $response;
}
}
Register the middleware in the kernel.php located in app/http
namespace App\Http;

use Illuminate\Foundation\Http\Kernel as HttpKernel;

class Kernel extends HttpKernel
{
protected $middleware = [
// \App\Http\Middleware\TrustHosts::class,
...
\App\Http\Middleware\CORSMiddleware::class,
];

protected $middlewareGroups = [
'web' => [
\App\Http\Middleware\EncryptCookies::class,
\Illuminate\Cookie\Middleware\AddQueuedCookiesToResponse::class,
\Illuminate\Session\Middleware\StartSession::class,
// \Illuminate\Session\Middleware\AuthenticateSession::class,
\Illuminate\View\Middleware\ShareErrorsFromSession::class,
\App\Http\Middleware\VerifyCsrfToken::class,
\Illuminate\Routing\Middleware\SubstituteBindings::class,
],

'api' => [
'throttle:api',
\Illuminate\Routing\Middleware\SubstituteBindings::class,
],
];

protected $routeMiddleware = [
...
'CORS' => \App\Http\Middleware\CORSMiddleware::class,
];
}
9. Create API routes
Next, we are going to create routes for our API. This will create endpoints where we can access our application. We will also attach the CORSMiddleware we created in the previous section so that all our requests will pass through the middleware
use Illuminate\Http\Request;
use Illuminate\Support\Facades\Route;
use App\Http\Controllers\UserController;
/*
|--------------------------------------------------------------------------
| API Routes
|--------------------------------------------------------------------------

*/

Route::group(['prefix' => 'users', 'middleware' => 'CORS'], function ($router) {
Route::post('/register', [UserController::class, 'register'])->name('register.user');
Route::post('/login', [UserController::class, 'login'])->name('login.user');
Route::get('/view-profile', [UserController::class, 'viewProfile'])->name('profile.user');
Route::get('/logout', [UserController::class, 'logout'])->name('logout.user');
});
10. Create a respondWithToken helper function in Controller.php
We will create a helper function that helps to return response with token inside Controller.php. We will be able to access this function in our UserContoller (which we will create very soon) or any other controller for that matter because they are extending the Controller class.
namespace App\Http\Controllers;

use Illuminate\Foundation\Auth\Access\AuthorizesRequests;
use Illuminate\Foundation\Bus\DispatchesJobs;
use Illuminate\Foundation\Validation\ValidatesRequests;
use Illuminate\Routing\Controller as BaseController;


class Controller extends BaseController
{
use AuthorizesRequests, DispatchesJobs, ValidatesRequests;


public function respondWithToken($token, $responseMessage, $data){
return \response()->json([
"success" => true,
"message" => $responseMessage,
"data" => $data,
"token" => $token,
"token_type" => "bearer",
],200);
}
}
NB: This step is superfluous to the application. You can still design your application in other ways. You may decide to handle everything inside your controller. This is just a personal preference.
11. Create Controller methods to handle our register, login, logout, and view-profile
Create a controller class (UserController) for these methods. To create the controller, run php artisan make:controller UserController
namespace App\Http\Controllers;
use Illuminate\Http\Request;
use App\Models\User;
use Auth;
use Validator;
use Illuminate\Support\Facades\Hash;

class UserController extends Controller
{
//

protected $user;

public function __construct(){
$this->middleware("auth:api",["except" => ["login","register"]]);
$this->user = new User;
}


public function register(Request $request){
$validator = Validator::make($request->all(),[
'name' => 'required|string',
'email' => 'required|string|unique:users',
'password' => 'required|min:6|confirmed',
]);
if($validator->fails()){
return response()->json([
'success' => false,
'message' => $validator->messages()->toArray()
], 500);
}

$data = [
"name" => $request->name,
"email" => $request->email,
"password" => Hash::make($request->password)
];

$this->user->create($data);

$responseMessage = "Registration Successful";

return response()->json([
'success' => true,
'message' => $responseMessage
], 200);

}

public function login(Request $request){
$validator = Validator::make($request->all(),[
'email' => 'required|string',
'password' => 'required|min:6',
]);

if($validator->fails()){
return response()->json([
'success' => false,
'message' => $validator->messages()->toArray()
], 500);
}

$credentials = $request->only(["email","password"]);
$user = User::where('email',$credentials['email'])->first();
if($user){
if(!auth()->attempt($credentials)){
$responseMessage = "Invalid username or password";
return response()->json([
"success" => false,
"message" => $responseMessage,
"error" => $responseMessage
], 422);
}
$accessToken = auth()->user()->createToken('authToken')->accessToken;
$responseMessage = "Login Successful";
return $this->respondWithToken($accessToken,$responseMessage,auth()->user());
}
else{
$responseMessage = "Sorry, this user does not exist";
return response()->json([
"success" => false,
"message" => $responseMessage,
"error" => $responseMessage
], 422);
}
}

public function viewProfile(){
$responseMessage = "user profile";
$data = Auth::guard("api")->user();
return response()->json([
"success" => true,
"message" => $responseMessage,
"data" => $data
], 200);
}

public function logout(){
$user = Auth::guard("api")->user()->token();
$user->revoke();
$responseMessage = "successfully logged out";
return response()->json([
'success' => true,
'message' => $responseMessage
], 200);
}
}
Import the User class, also import Auth, Validator and Hash for generating passwords. From the constructor, only login and register are the functions you can access without being logged in. Also, we declared variable $user and call it inside the constructor.
Register
We create a register function. In the function, we validate the request, hash the password from the request and create a new user.
Login
Next, we create the login function. We validate the input data as we did in the register function. After that, we obtain the credentials from our input (email and password in this case). Furthermore, we check if the user exist. If the user exist, we return with a success message. We then attempt login. If login is successful, we return with access token and a success response. If login is not successful, we return with a failure message.
View-profile
In the view-profile function, we target our guard and pick out the user within the guard. This gives us the details of the currently logged in user within the guard which we set as “api” in step 7 above. Since this method is not among the ones that we declared in our controller, this means the endpoint for this method will require access token to access it. You will see a demonstration of this very soon.
12. Start the Server
After everything that we have implemented, it’s now time to start our laravel server. To do this, Run php artisan serve
13. Test on postman
We will now test our API endpoints on Postman. I tested mine already, and the outcomes are shown below.
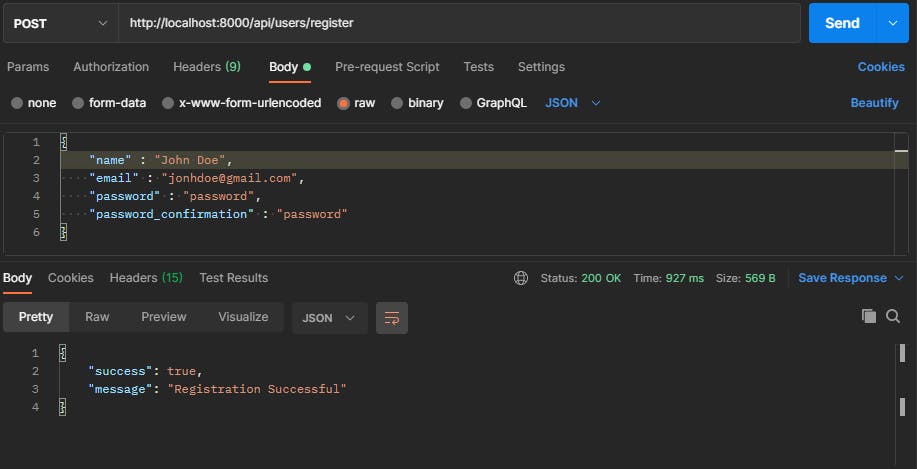
Register
First, test the register endpoint, inputting the right details. You'll get a "registration successful" message
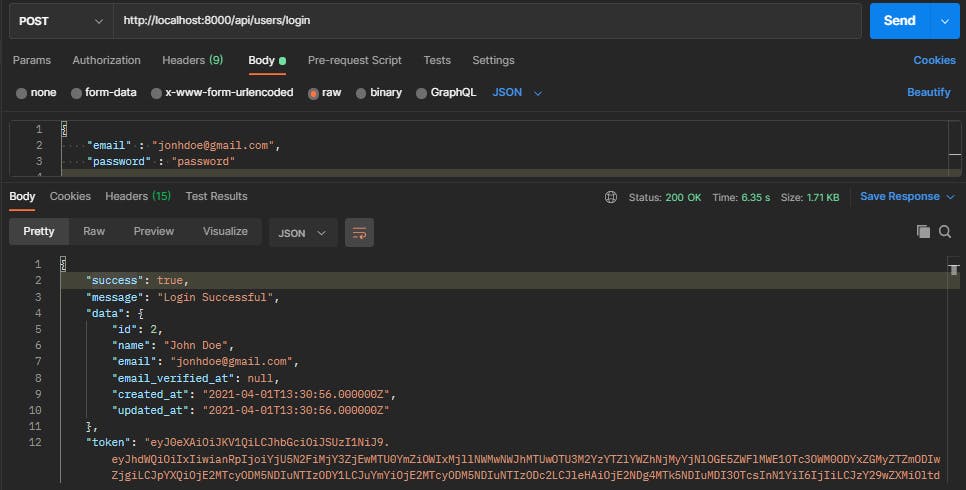
Login
On logging in, we get a login successful message and we also get the access token. This will allow us to access protected endpoints.
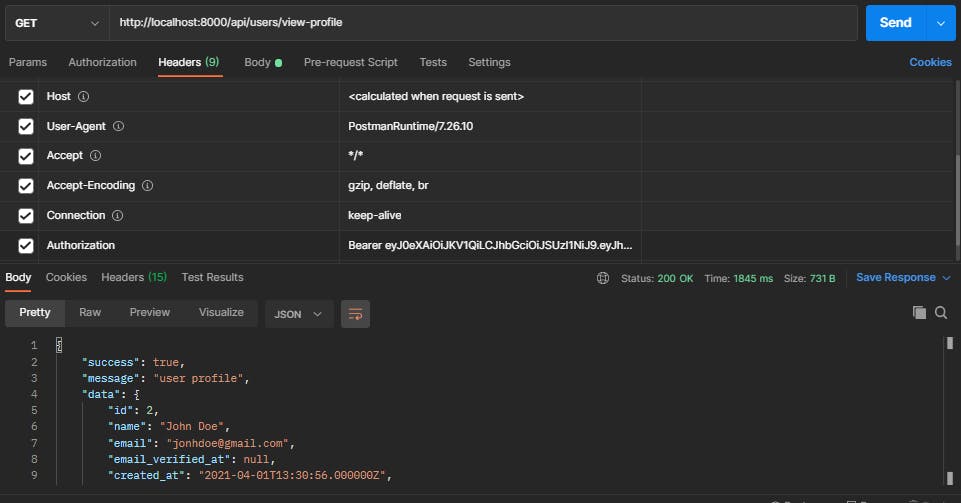
View-profile
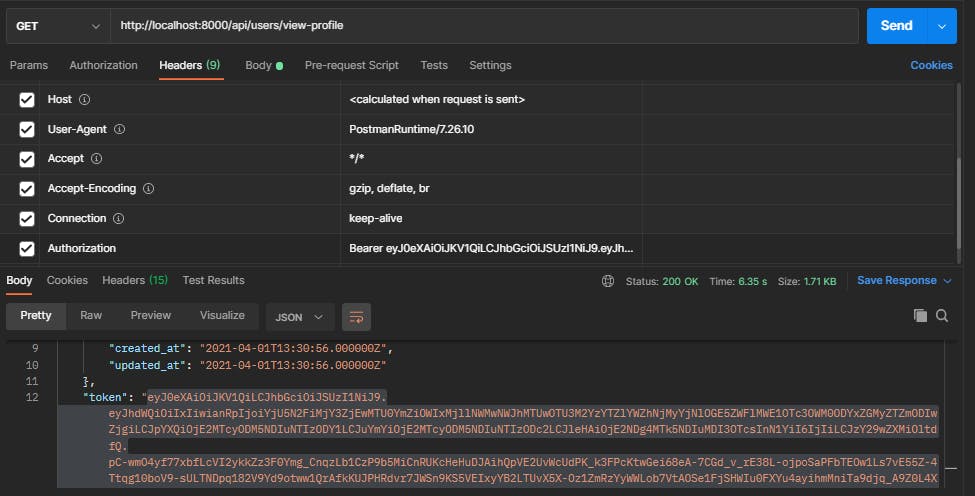
To access protected endpoints such as view-profile, we use the access token as shown above. You add it to the authorization header and then, send the request. The outcome is shown below
That is it. Our backend (API service) is now complete. Next, we move to the frontend which will come in the second part of this tutorial.